- A+
本篇和大家分享的是springboot打包并结合shell脚本命令部署,重点在分享一个shell程序启动工具,希望能便利工作
- profiles指定不同环境的配置
- maven-assembly-plugin打发布压缩包
- 分享shenniu_publish.sh程序启动工具
- linux上使用shenniu_publish.sh启动程序
profiles指定不同环境的配置
通常一套程序分为了很多个部署环境:开发,测试,uat,线上 等,我们要想对这些环境区分配置文件,可以通过两种方式:
- 通过application.yml中编码指定 profile.active=uat 方式指定
- 通过mvn中profiles来区分不同环境对应的配置文件夹,人工可以手动在idea勾选生成不同环境的包(推荐)
这里我们要讲的是第二种,首先在mvn中配置如下内容:
    <profiles>
        <profile>
            <id>node</id>
            <properties>
                <!--传递给脚本的参数值-->
                <activeProfile>node</activeProfile>
                <package-name>${scripts_packageName}</package-name>
                <boot-main>${scripts_bootMain}</boot-main>
            </properties>
            <activation>
                <activeByDefault>true</activeByDefault>
            </activation>
        </profile>
        <profile>
            <id>node1</id>
            <properties>
                <activeProfile>node1</activeProfile>
                <package-name>${scripts_packageName}</package-name>
                <boot-main>${scripts_bootMain}</boot-main>
            </properties>
        </profile>
        <profile>
            <id>node2</id>
            <properties>
                <activeProfile>node2</activeProfile>
                <package-name>${scripts_packageName}</package-name>
                <boot-main>${scripts_bootMain}</boot-main>
            </properties>
        </profile>
    </profiles>
节点粗解:
- id:用来指定不同环境配置文件所在的目录,如下我这里:
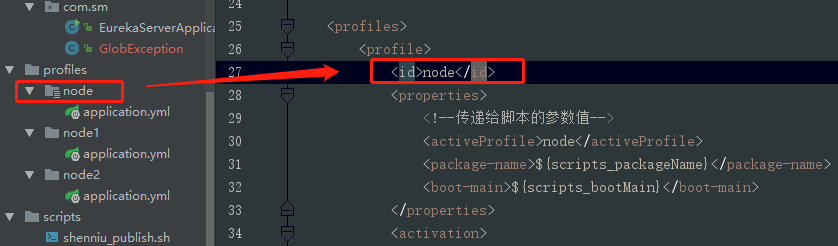
- properties:该节点中的节点是可作为参数传递给其他配置文件,如我这里的package-name节点值就可以在另外的assembly.xml或者shell脚本文件中通过${package-name}获取到,如下:

- activeByDefault:指定默认环境配置文件夹
maven-assembly-plugin打发布压缩包
对于springboot程序打包,可以分为jar和war,这里是jar包;有场景是咋们配置文件或者第三方等依赖包不想放到工程jar中,并且把这些文件压缩成一个zip包,方便上传到linux;此时通过maven-assembly-plugin和maven-jar-plugin就可以做到,mvn的配置如:
            <plugin>
                <groupId>org.apache.maven.plugins</groupId>
                <artifactId>maven-jar-plugin</artifactId>
                <version>2.6</version>
                <configuration>
                    <archive>
                        <addMavenDescriptor>false</addMavenDescriptor>
                        <manifest>
                            <addClasspath>true</addClasspath>
                            <classpathPrefix>lib/</classpathPrefix>
                            <mainClass>${scripts_bootMain}</mainClass>
                        </manifest>
                    </archive>
                    <!--打包排除项-->
                    <excludes>
                        <exclude>**/*.yml</exclude>
                        <exclude>**/*.properties</exclude>
                        <exclude>**/*.xml</exclude>
                        <exclude>**/*.sh</exclude>
                    </excludes>
                </configuration>
                <executions>
                    <execution>
                        <id>make-a-jar</id>
                        <phase>compile</phase>
                        <goals>
                            <goal>jar</goal>
                        </goals>
                    </execution>
                </executions>
            </plugin>

            <plugin>
                <groupId>org.apache.maven.plugins</groupId>
                <artifactId>maven-assembly-plugin</artifactId>
                <version>2.4</version>
                <!-- The configuration of the plugin -->
                <configuration>
                    <!-- Specifies the configuration file of the assembly plugin -->
                    <descriptors>
                        <descriptor>${project.basedir}/src/main/assembly/assembly.xml</descriptor>
                    </descriptors>
                </configuration>
                <executions>
                    <execution>
                        <id>make-assembly</id>
                        <phase>package</phase>
                        <goals>
                            <goal>single</goal>
                        </goals>
                    </execution>
                </executions>
            </plugin>
值得注意的地方如下几点:
- mainClass节点:用来指定启动main函数入口类路径,如这里的:com.sm.EurekaServerApplication
- excludes节点:排除主jar包中配置等一些列后缀文件,因为我们要包这些配置文件放到主包外面
- descriptor节点:用来指定assembly插件对应的assembly.xml配置文件
有了上面mvn配置,我们还需要assembly.xml的配置,这里提取了结合shell脚本发布程序的配置:
<assembly xmlns="http://maven.apache.org/ASSEMBLY/2.0.0" xmlns:xsi="http://www.w3.org/2001/XMLSchema-instance"
          xsi:schemaLocation="http://maven.apache.org/ASSEMBLY/2.0.0 http://maven.apache.org/xsd/assembly-2.0.0.xsd
http://maven.apache.org/ASSEMBLY/2.0.0 ">
    <id>${activeProfile}</id>
    <!--打包成一个用于发布的zip文件-->
    <formats>
        <format>zip</format>
    </formats>
    <!--true:zip中生成一级目录(此处屏蔽,配合脚本需要profiles后缀)-->
    <includeBaseDirectory>false</includeBaseDirectory>
    <dependencySets>
        <dependencySet>
            <!--打包进zip文件的lib目录-->
            <useProjectArtifact>false</useProjectArtifact>
            <outputDirectory>${package-name}-${activeProfile}/lib</outputDirectory>
            <unpack>false</unpack>
        </dependencySet>
    </dependencySets>

    <fileSets>
        <!-- 配置文件打包进zip文件的conf目录 -->
        <fileSet>
            <directory>${project.basedir}/src/main/profiles/${activeProfile}</directory>
            <outputDirectory>${package-name}-${activeProfile}/conf</outputDirectory>
            <includes>
                <include>**/*</include>
                <!--<include>*.xml</include>-->
                <!--<include>*.properties</include>-->
                <!--<include>*.yml</include>-->
            </includes>
        </fileSet>

        <!--启动脚本打包进zip文件-->
        <fileSet>
            <directory>${project.basedir}/src/main/scripts</directory>
            <outputDirectory></outputDirectory>
            <includes>
                <include>**/*</include>
            </includes>
            <!-- 文件文件权限为777 -->
            <fileMode>777</fileMode>
            <!-- 目录权限为777  -->
            <directoryMode>777</directoryMode>
            <!--脚本中参数变量为pom中的值 关键-->
            <filtered>true</filtered>
        </fileSet>

        <!-- 项目编译出来的jar打包进zip文件 -->
        <fileSet>
            <directory>${project.build.directory}</directory>
            <outputDirectory>${package-name}-${activeProfile}/</outputDirectory>
            <includes>
                <include>*.jar</include>
            </includes>
        </fileSet>
    </fileSets>
</assembly>
重点节点介绍:
- formats节点:把配置文件和jar包等压缩成什么文件格式,这里可以有:zip,tar等
- fileMode节点:指定scripts目录下脚本文件(这里是:shenniu_publish.sh)在linux上文件权限为777
- filtered节点:脚本中参数变量为pom的profiles中properties的值(该配置,是把mvn中属性值映射生成到sh文件中,如:${package-name})
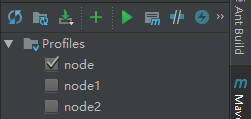
完成上面配置后,此时我们可以通过idea上勾选切换不同环境来打zip包,如图:
分享shenniu_publish.sh程序启动工具
上面步骤完成了zip格式的发布包,我们再分享下启动程序的shell脚本,该脚本具有的功能如:
- 解压zip+启动jar包
- 启动jar包
- 停止对应jar运行
- 重启jar程序
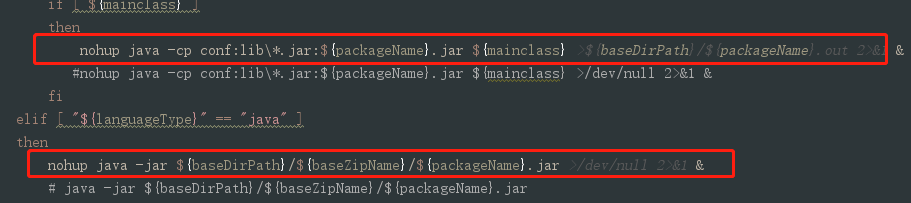
目前该shell中封装了两种启动jar命令的方式:
- java -cp
- java -jar
如图命令格式:
来看全部的shell代码:
#!/usr/bin/env bash
#可变参数变量
languageType="javac" #支持 java,javac,netcore 发布
#参数值由pom文件传递
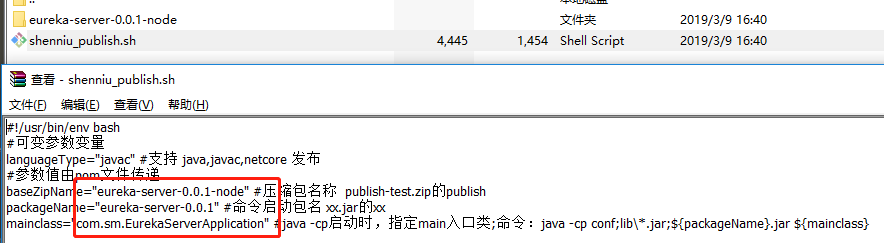
baseZipName="${package-name}-${activeProfile}" #压缩包名称 publish-test.zip的publish
packageName="${package-name}" #命令启动包名 xx.jar的xx
mainclass="${boot-main}" #java -cp启动时,指定main入口类;命令:java -cp conf;lib\*.jar;${packageName}.jar ${mainclass}
#例子
# baseZipName="publish-test" #压缩包名称 publish-test.zip的publish
# packageName="publish" #命令启动包名 publish.jar的xx
#固定变量
basePath=$(cd `dirname $0`/; pwd)
baseZipPath="${basePath}/${baseZipName}.zip" #压缩包路径
baseDirPath="${basePath}" #解压部署磁盘路径
pid= #进程pid
#解压
function shenniu_unzip()
{
echo "解压---------------------------------------------"
echo "压缩包路径:${baseZipPath}"
if [ ! `find ${baseZipPath}` ]
then
echo "不存在压缩包:${baseZipPath}"
else
echo "解压磁盘路径:${baseDirPath}/${baseZipName}"
echo "开始解压..."
#解压命令
unzip -od ${baseDirPath}/${baseZipName} ${baseZipPath}
#设置执行权限
chmod +x ${baseDirPath}/${baseZipName}/${packageName}
echo "解压完成。"
fi
}
#检测pid
function getPid()
{
echo "检测状态---------------------------------------------"
pid=`ps -ef | grep -n ${packageName} | grep -v grep | awk '{print $2}'`
if [ ${pid} ]
then
echo "运行pid:${pid}"
else
echo "未运行"
fi
}
#启动程序
function start()
{
#启动前,先停止之前的
stop
if [ ${pid} ]
then
echo "停止程序失败,无法启动"
else
echo "启动程序---------------------------------------------"
#选择语言类型
read -p "输入程序类型(java,javac,netcore),下一步按回车键(默认:${languageType}):" read_languageType
if [ ${read_languageType} ]
then
languageType=${read_languageType}
fi
echo "选择程序类型:${languageType}"
#进入运行包目录
cd ${baseDirPath}/${baseZipName}
#分类启动
if [ "${languageType}" == "javac" ]
then
if [ ${mainclass} ]
then
nohup java -cp conf:lib\*.jar:${packageName}.jar ${mainclass} >${baseDirPath}/${packageName}.out 2>&1 &
#nohup java -cp conf:lib\*.jar:${packageName}.jar ${mainclass} >/dev/null 2>&1 &
fi
elif [ "${languageType}" == "java" ]
then
nohup java -jar ${baseDirPath}/${baseZipName}/${packageName}.jar >/dev/null 2>&1 &
# java -jar ${baseDirPath}/${baseZipName}/${packageName}.jar
elif [ "${languageType}" == "netcore" ]
then
#nohup dotnet run ${baseDirPath}/${baseZipName}/${packageName} >/dev/null 2>&1 &
nohup ${baseDirPath}/${baseZipName}/${packageName} >/dev/null 2>&1 &
fi
#查询是否有启动进程
getPid
if [ ${pid} ]
then
echo "已启动"
#nohup日志
tail -n 50 -f ${baseDirPath}/${packageName}.out
else
echo "启动失败"
fi
fi
}
#停止程序
function stop()
{
getPid
if [ ${pid} ]
then
echo "停止程序---------------------------------------------"
kill -9 ${pid}
getPid
if [ ${pid} ]
then
#stop
echo "停止失败"
else
echo "停止成功"
fi
fi
}
#启动时带参数,根据参数执行
if [ ${#} -ge 1 ]
then
case ${1} in
"start")
start
;;
"restart")
start
;;
"stop")
stop
;;
"unzip")
#执行解压
shenniu_unzip
#执行启动
start
;;
*)
echo "${1}无任何操作"
;;
esac
else
echo "
command如下命令:
unzip:解压并启动
start:启动
stop:停止进程
restart:重启
示例命令如:./shenniu_publish start
"
fi
正如上面小节说的,shell中的参数 package-name,activeProfile,boot-main 都是由mvn中profiles的properties中提供,是可变的参数,脚本代码本身不需要人工去修改,只需要变的是mvn的参数即可
其实在我们生成zip包的时候,shell中的参数就被替换了,可以看zip中shell文件内容如:
linux上使用shenniu_publish.sh启动程序
把生成的zip上传到linux上,通过命令解压:
unzip -od eureka-server-0.0.1-node eureka-server-0.0.1-node.zip
其实shell脚本中包含有解压命令,但是我在打包时放在了zip中,所以只能通过手动解压了,当然可以调整;此时进入加压目录如此:

注:这里第一次执行./shenniu_publish.sh脚本时候,提示了错误信息;是由于我是在windows上编辑的这个脚本,其空格等和linux上不一样,所以运行会有问题,要解决可以使用vim命令在linux把该文件转成linux格式,如下命令:
vim shenniu_publish.sh
set ff=unix
:wq
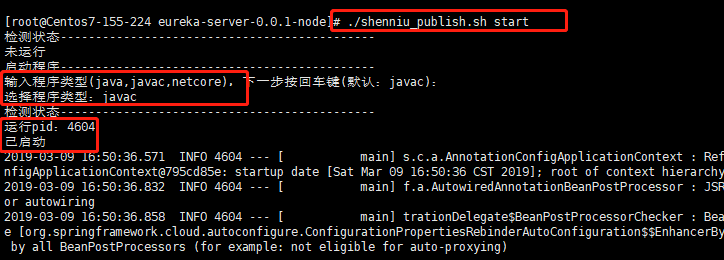
执行完后,再来运行脚本./shenniu_publish.sh,此时有如下提示:

此刻我们文件是解压状态,因此只需要start命令启动程序即可:
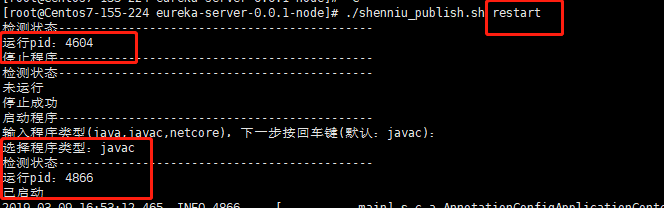
到这里shenniu_publish.sh脚本使用就完成了,只要脚本没有提示错误,基本都能启动jar服务;其他restart和stop命令也如此执行就行:
可以去研究下shell代码,希望该脚本能给你带来效率和好的学习思路,下面是测试用例git地址,脚本在eureka-server项目中:
https://github.com/shenniubuxing3/springcloud-Finchley.SR2
- 安卓客户端下载
- 微信扫一扫
-

- 微信公众号
- 微信公众号扫一扫
-